 Save
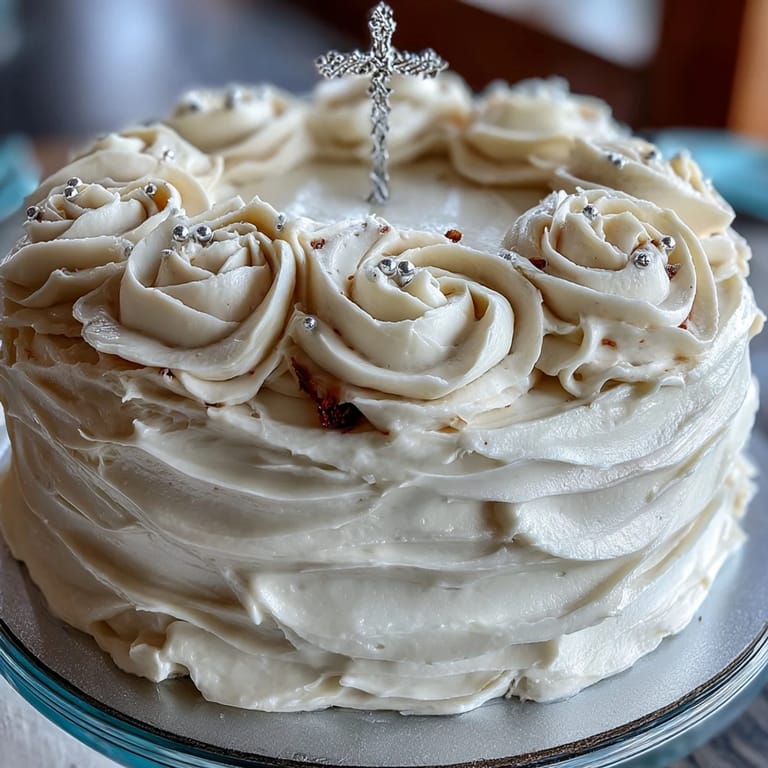
Save My sister called me in a slight panic three weeks before her daughter's First Communion, asking if I could bake something special. I'd never made a fondant rose before, but something about the request—wanting the cake to feel both celebratory and reverent—made me determined to try. Standing in my kitchen that evening, I realized this wasn't just about baking; it was about marking a milestone that deserved something made with intention and care.
I'll never forget the moment my niece saw that cake sitting on the table at her reception. She was quiet for a second—seven years old and taking it all in—before breaking into this enormous grin. Watching her point out each rose to her friends, explaining that her aunt made it, made every fondant petal I'd wrestled with feel completely worth it.
Ingredients
- All-purpose flour: Two and a half cups gives you structure without heaviness; sift it if you have time, though whisking works fine too.
- Baking powder: Those two and a half teaspoons are your lift—don't skip sifting it with the flour or you'll get dense pockets.
- Salt: Half a teaspoon seems tiny, but it's the secret that makes people taste vanilla first, not sweetness.
- Unsalted butter: One cup softened to room temperature beats faster and incorporates air more reliably than cold butter.
- Granulated sugar: Two cups creamed with the butter for three solid minutes creates that light, fluffy base that makes the cake tender.
- Eggs: Room temperature eggs blend smoother and help the batter stay emulsified; cold eggs can look curdled and scare you half to death.
- Pure vanilla extract: One tablespoon of the real stuff—not imitation—makes a noticeable difference in a cake this simple.
- Whole milk: One cup at room temperature prevents temperature shock to your batter and keeps everything mixing evenly.
- Unsalted butter for frosting: One and a half cups softened, because cold butter won't beat to that cloud-like texture you need.
- Powdered sugar: Five cups sifted removes lumps that ruin frosting texture; I learned this the hard way with a grainy mess.
- Vanilla extract: Two teaspoons in the frosting builds on the cake's flavor without making it cloying.
- Milk or heavy cream: Add it slowly, one tablespoon at a time, because once it's too thin, you have to start again.
- White fondant: Sixteen ounces gets you enough to cover the cake plus make roses with room to spare.
- Green gel food coloring: Optional but transforms your roses from pretty to stunning when paired with pale green leaves.
- Edible pearls or dragees: These catch light and add a touch of elegance without any flavor impact.
- Cross topper: Make sure it's food-safe if edible, or place it on parchment if decorative.
Tired of Takeout? 🥡
Get 10 meals you can make faster than delivery arrives. Seriously.
One email. No spam. Unsubscribe anytime.
Instructions
- Prepare your pans:
- Set your oven to 350°F and grease two eight-inch round pans, then line the bottoms with parchment—this step saves heartbreak when you're turning warm cakes onto racks.
- Build your dry blend:
- Whisk flour, baking powder, and salt together in a medium bowl, letting air into the flour so it distributes evenly throughout the batter.
- Cream the foundation:
- Beat softened butter and sugar together for three full minutes until it looks pale and fluffy, not dense and grainy—this takes longer than you think but matters enormously.
- Add eggs one by one:
- Drop each egg in and beat well before adding the next; this prevents that broken, separated look that makes bakers nervous.
- Mix in vanilla:
- Stir in the vanilla extract after the eggs are fully incorporated, so it disperses throughout rather than pooling.
- Alternate wet and dry:
- With your mixer on low, add about a third of the flour mixture, then half the milk, then another third of flour, then the rest of the milk, finishing with the final flour—this prevents overmixing and keeps your cake tender.
- Fill the pans:
- Divide batter evenly between your prepared pans and smooth the tops gently with a spatula; they'll rise slightly and level out during baking.
- Bake with patience:
- Bake for thirty to thirty-five minutes until a toothpick poked in the center comes out with just a few moist crumbs, not wet batter. Your kitchen will smell unbelievably good.
- Cool in stages:
- Let cakes rest in their pans for ten minutes—this sets them just enough to unmold safely—then turn them out onto wire racks to cool completely, which takes about an hour.
- Prepare the frosting:
- Beat softened butter until it's creamy and pale, then gradually add sifted powdered sugar in batches so it doesn't cloud your kitchen in white dust.
- Finish frosting consistency:
- Add vanilla and salt, then add milk one tablespoon at a time until you reach a spreadable texture—stiff enough to hold shape but soft enough to swirl.
- Level your layers:
- If your cake layers domed slightly, use a serrated knife to gently trim the tops level so they stack evenly.
- Crumb coat first:
- Place one cake layer on your cake board, spread a thin layer of frosting, add the second layer, then coat the entire cake with a thin frosting layer that seals in crumbs. Chill this for twenty minutes so your final coat goes on smoothly.
- Apply the final frosting:
- Spread a smooth, generous final layer of frosting, using an offset spatula dipped in warm water for a polished finish.
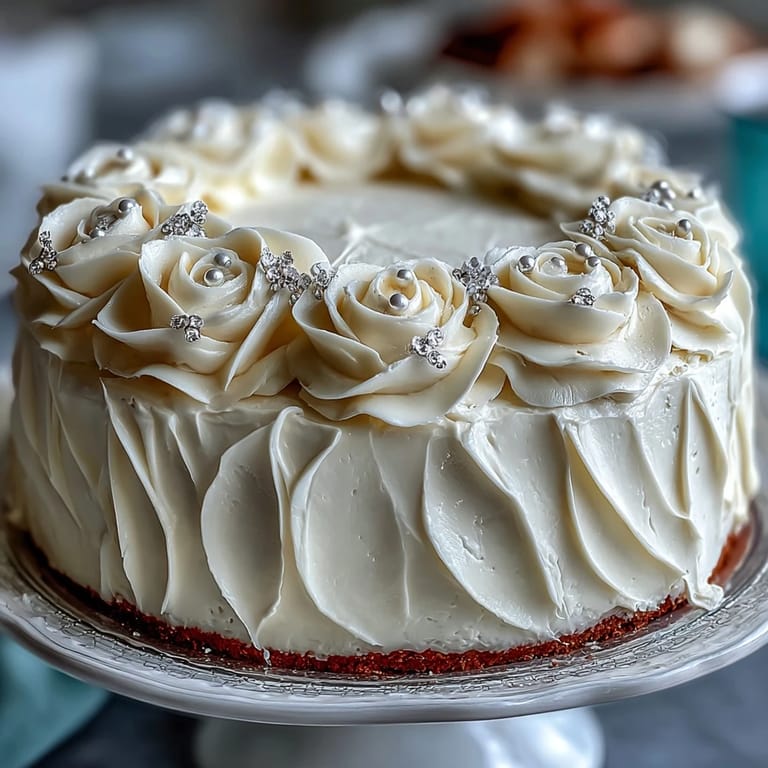
- Craft your fondant roses:
- Roll white fondant to about one-eighth-inch thick, then create roses by rolling tiny balls, flattening them into petal shapes, and layering them into blooms—this takes practice but becomes almost meditative.
- Add greenery:
- Tint a small amount of fondant pale green with gel coloring and cut or shape it into leaves to nestle among your roses.
- Decorate the cake:
- Arrange your fondant roses on the frosted cake however feels right, tucking in leaves and adding edible pearls or dragees for sparkle and dimension.
- Crown it:
- Place your cross topper at the center of the cake, positioning it gently so it sits secure and visible.
- Chill before serving:
- Refrigerate the finished cake for at least a few hours so all the elements set beautifully and the cake slices cleanly.
 Pin it
 Three days after that reception, my sister texted me a photo of my niece in her communion dress, holding a slice of cake and grinning at the camera. She'd saved a piece in the freezer, she said, because it meant something to keep.
Working with Fondant Without Fear
The first time I worked with fondant, I treated it like spun glass, afraid any touch would destroy it. What I learned instead is that fondant wants to be handled—it just needs cool hands and a light touch. Warming it slightly in your palms softens it just enough to shape, but leaving it on the counter too long makes it sticky and frustrating. I now keep a small bowl of cool water nearby and dip my fingers in occasionally to keep things manageable, which sounds silly but genuinely helps.
Making Your Roses Look Intentional
My first fondant roses looked like slightly deformed lumps, and I almost scraped them off the cake in embarrassment. But then I realized something: imperfection actually reads as handmade and precious, not amateur. I stopped trying to make them perfectly symmetrical and started thinking about them like garden roses—layered, slightly irregular, more alive. Now when people see them, they notice the care, not the technical imperfection. Rolling the petals on your work surface and layering them loosely, rather than trying to engineer each one, actually looks better and goes faster.
Timing and Temperature Matter More Than You'd Think
I baked this cake the night before the reception, and while I could have decorated it earlier, I'm so glad I waited until the morning of to add the fondant roses and topper. Fondant exposed to air for too long starts drying out and cracking, and the cake tastes fresher when the layers haven't been sitting too long. If you're making this for an event, bake the cake a day ahead, chill it covered, then do most of your decorating the morning of or as close to serving as you can manage. This also means less last-minute stress and a cake that tastes like it was just pulled together with love.
- Keep your finished cake in a cool room away from direct sunlight, which can fade your white fondant and melt your frosting.
- If your roses are looking dull, a very light dusting of edible pearl dust mixed with a tiny bit of vodka can add shimmer without changing the color.
- Slice the cake with a warm, wet knife that you wipe clean between cuts for the sharpest, most beautiful slices.
 Pin it
 This cake became more than a dessert the moment I realized I was baking a memory—something my niece would taste and remember, maybe someday make for her own daughter. That shift in perspective made every step feel sacred.
Frequently Asked Questions
- → What type of flour is recommended for the sponge?
All-purpose flour is suggested for a tender crumb and balanced texture.
- → How can I make the buttercream smooth?
Beat the butter until creamy before gradually adding powdered sugar and milk for the perfect consistency.
- → Can the fondant decorations be made ahead?
Yes, fondant roses and leaves can be shaped in advance and stored in an airtight container.
- → What oven temperature ensures even baking?
Preheating to 350°F (175°C) and baking for 30-35 minutes yields ideal results.
- → Are there alternatives for a lighter cake texture?
Substituting half the butter with vegetable oil creates a lighter sponge without sacrificing flavor.