 Save
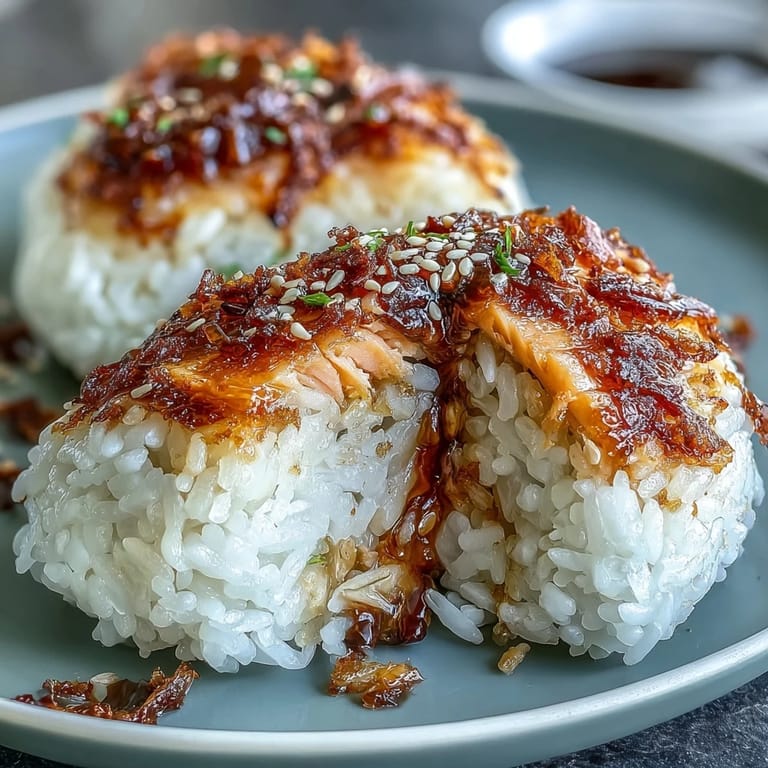
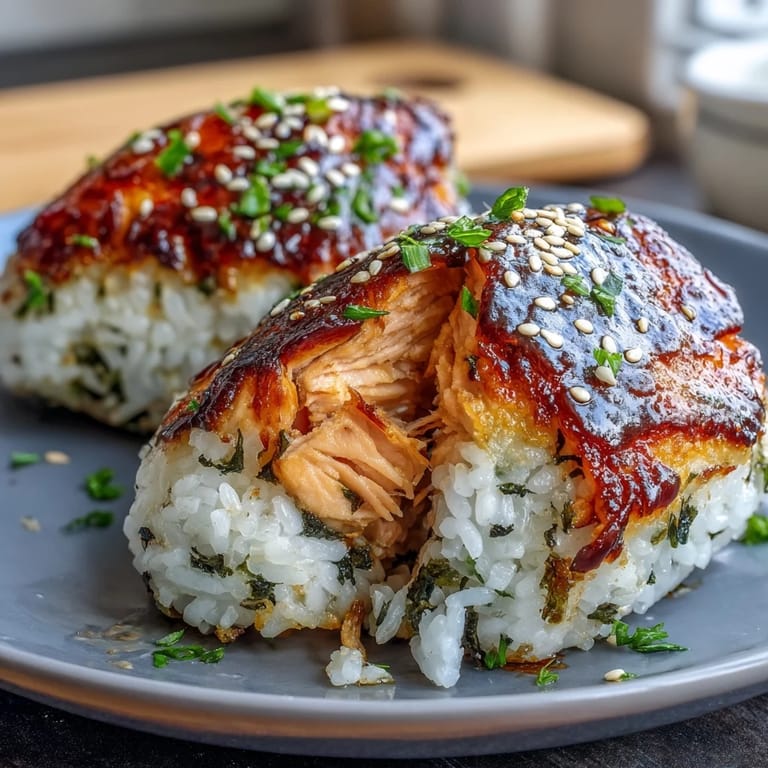
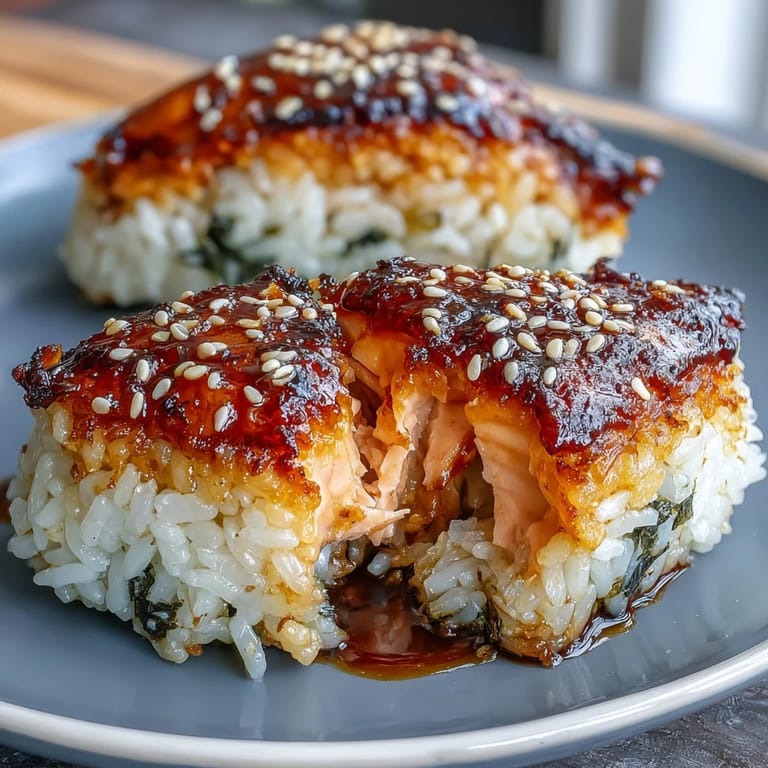
Save The first time I attempted grilled salmon onigiri, the scent of sizzling fish mixing with warm rice immediately claimed the kitchen. I remember the sound of nori crackling as I pressed it around the rice triangles, hands sticking slightly from the starch. All around me were the comforting pops and hisses from the grill pan, and a sense of anticipation that had the whole space feeling expectant. There’s something satisfying about shaping each ball, like working with edible clay, and the gentle crunch as you bite in always feels like you earned it.
Once, I made a batch of these for a sunny lakeside picnic with friends, and someone asked if I picked them up at a fancy Japanese deli. The impromptu guessing game about the filling—was it tuna, mackerel, smoked something?—was only settled when I handed them another, this time with a hint of wasabi peeking from the center.
Ingredients
- Salmon fillet: Grilling fresh, skinless salmon keeps the filling juicy; try to avoid overcooking for the most tender results.
- Soy sauce: A little goes a long way to add depth, especially when brushed onto onigiri before crisping.
- Mirin: Just a splash brings subtle sweetness, balancing the savory notes of salmon and soy.
- Toasted sesame oil: A drizzle accentuates the aroma—don’t skip this if you love a nutty edge.
- Salt and black pepper: Season judiciously at each step for layered flavor; a final pinch on your hands helps season the rice outside.
- Japanese short-grain rice: Stickiness is key to onigiri’s shape; don’t swap for long-grain rice or the balls won’t hold together.
- Rice vinegar (optional): Stirring in a spoonful after cooking lends a delicate tang and shine, especially welcome if you like sushi-style rice.
- Nori sheets: Crisp seaweed wraps the warm onigiri and keeps fingers mess-free; halve the sheets for the neatest fit.
- Toasted white sesame seeds (optional): Sprinkling these on top adds crunch and a whiff of roasted flavor.
- Water for shaping: Wetting your hands prevents sticky disasters and makes the forming process actually fun.
- Salt for shaping: Rubbing a pinch onto palms before handling rice seasons the outside beautifully.
Tired of Takeout? 🥡
Get 10 meals you can make faster than delivery arrives. Seriously.
One email. No spam. Unsubscribe anytime.
Instructions
- Make the rice just right:
- Rinse short-grain rice under cold water, swirling with your fingers, until the runoff is clear and the grains feel slick. Cook in a rice cooker or small saucepan with measured water until tender and sticky, then let the steam infuse for 10 minutes before folding in the salt and vinegar.
- Grill the salmon:
- Brush the fillet with a magical mix of soy, mirin, sesame oil, salt, and pepper, then grill or bake until it’s just cooked through—listen for a faint sizzle and flake it with a fork.
- Shape your onigiri:
- Gather your bowls of water and salt, wet your hands generously, and grab a small handful of warm rice. Flatten into a palm-sized disk, add a spoonful of flaked salmon, and gently mold the rice around the filling, forming a firm triangle or oval (don’t fret if the first one’s a little lopsided—mine was, too).
- Get them golden:
- Heat a lightly oiled grill pan or nonstick skillet, then gently lay onigiri down, listening for the hiss as they crisp. Turn after 2–3 minutes per side, optionally brushing with soy sauce for a rich glaze and extra golden color.
- Wrap and finish:
- Wrap each warm onigiri with a nori strip for both handle and crunch, then scatter with toasted sesame seeds. Serve right away or let cool to room temperature for a perfect snack.
 Pin it
 The evening my cousin tried his first homemade onigiri, he took a messy, overstuffed bite and sighed with the sort of relief only comfort food can bring. Suddenly, the kitchen felt less like a workspace and more like a place to share little edible surprises.
How to Avoid Common Onigiri Mishaps
I learned the hard way that impatient shaping leads to easily crumbled rice balls or burnt fingers. Giving the rice a few minutes to cool but leaving it warm helps it become just the right kind of pliable—moldable but not mushy.
Ideas for Mixing Up the Filling
If you want to play, try tucking in a bit of pickled plum or adding a flick of wasabi along with the salmon. Even canned salmon or leftover cooked fish can be delicious, especially when you mix in a touch more sesame oil or a sprinkle of shichimi pepper.
Making Your Kitchen Onigiri-Ready
Prepping a small assembly line of bowls for water, salt, and fillings makes everything feel less hectic and way more fun—invite kids or friends to join in, and expect laughter when shapes come out wobbly at first.
- Keep a little damp towel nearby to wipe off sticky fingers between onigiri.
- Slice nori only just before using so it stays as crisp as possible.
- Don’t be afraid of slightly uneven shapes—they have extra homemade charm.
 Pin it
 Grilled salmon onigiri are the kind of food that taste like care packed into each bite. The crispy edges and savory filling invite you to pause and savor the little victories in your kitchen.
Frequently Asked Questions
- → What is the best rice for onigiri?
Use Japanese short-grain rice for its sticky, tender texture that holds shape when molded. Rinse until water runs clear and rest covered for 10 minutes after cooking to let the grains settle.
- → How should the salmon be cooked and seasoned?
Brush the salmon with soy, mirin and a touch of sesame oil, then grill or bake until just cooked through. Flake with a fork so the filling is moist but not watery when placed in the rice.
- → Any tips for shaping firm onigiri?
Keep a small bowl of water and a pinch of salt nearby. Wet your hands, rub a little salt on the palms, and press the rice gently but firmly around the filling to compact the grains without crushing them.
- → How do I get a crisp exterior without drying the filling?
Lightly oil a nonstick skillet and grill the rice shapes over medium heat 2–3 minutes per side until golden. Brush with a little soy sauce near the end for color and extra umami without overcooking the salmon inside.
- → Can I make these ahead and store them?
Onigiri are best eaten the same day for optimal texture. If storing, cool completely and refrigerate in an airtight container for up to 24 hours; reheat briefly in a pan to restore some crispness before serving.
- → What are good filling substitutions or add-ins?
Try canned salmon, tuna with mayo, or umeboshi for acidity. Add a dab of wasabi or finely chopped scallion to the salmon for extra brightness and depth.