 Save
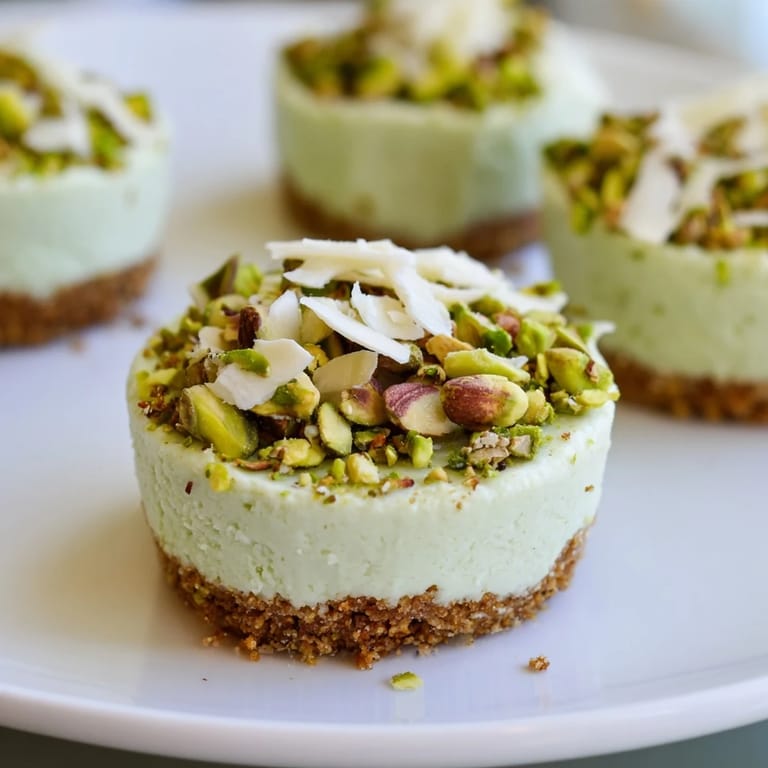
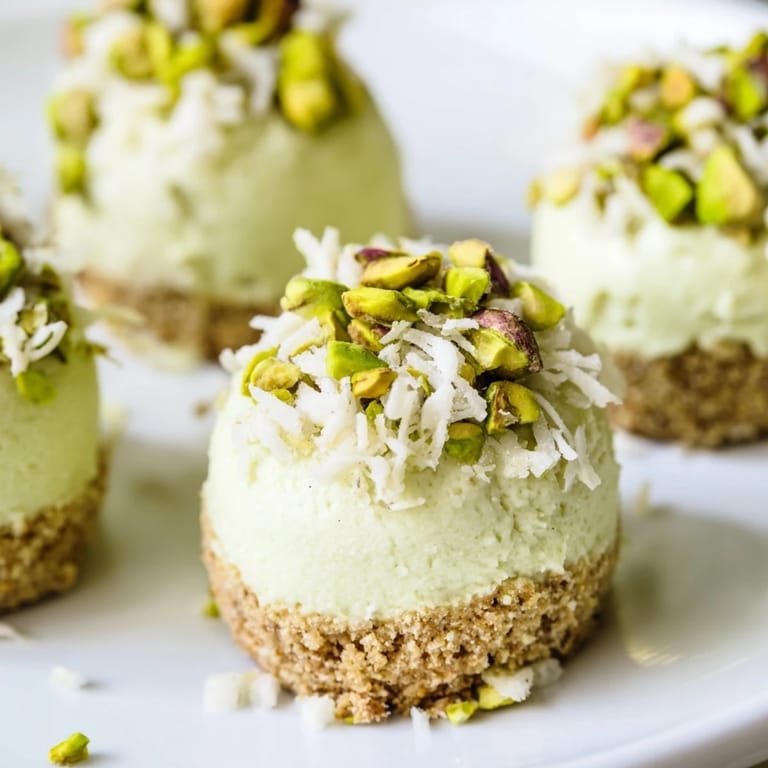
Save I discovered pistachio cheesecake bites on a Tuesday afternoon when my neighbor brought them to a book club meeting, and I couldn't stop at just one. The pale green filling caught the light in a way that made them look almost jewel-like, and when I bit through that buttery crust, something shifted—I had to know how to make these. A week later, I stood in my kitchen with a food processor and a plan, and by the third attempt, I finally nailed the texture that made them worth the chilling time.
I made these for my sister's engagement party last summer, and watching people pick them up off the platter with genuine hesitation—like they were almost too pretty to eat—reminded me why I love fussy little desserts. One guest asked for the recipe while her mouth was still full, which felt like the highest compliment possible, and honestly, that's when I knew I'd landed on something special.
Ingredients
- Shelled unsalted pistachios (1 cup): The real star of this show, so don't cheap out on them. I learned the hard way that stale pistachios make sad crusts, so buy from a place with good turnover and taste one before committing the whole cup.
- Graham cracker crumbs (1/2 cup): These are the glue that holds the crust together and adds a subtle sweetness that balances the pistachio's earthiness.
- Unsalted butter (3 tbsp, melted): This creates that sandy, pressed-down texture that holds like concrete but bites like butter.
- Granulated sugar (2 tbsp): Just enough sweetness for the crust so the filling doesn't have to do all the heavy lifting.
- Pinch of salt: This tiny amount makes the pistachio flavor punch harder than you'd expect.
- Cream cheese (8 oz, softened): Use the real thing, and let it sit on the counter for 30 minutes before beating, or you'll be wrestling with lumps.
- Powdered sugar (1/3 cup): Sifts in smoothly and dissolves into the filling without gritty moments.
- Heavy cream (1/4 cup): Whipped to soft peaks, this is what makes the filling cloud-light and not dense like regular cheesecake.
- Pistachio paste (1/3 cup): This is the secret ingredient that makes them taste authentically pistachio rather than like an afterthought. If you can't find it, you can make it by pulsing pistachios in a food processor until they surrender into butter—takes about 5 minutes of patience.
- Vanilla extract (1 tsp): A whisper of vanilla that ties all the flavors together without announcing itself.
- Lemon zest (from 1/2 lemon, optional): A sprinkle of this adds brightness that reminds your palate to keep enjoying the bite rather than getting bored halfway through.
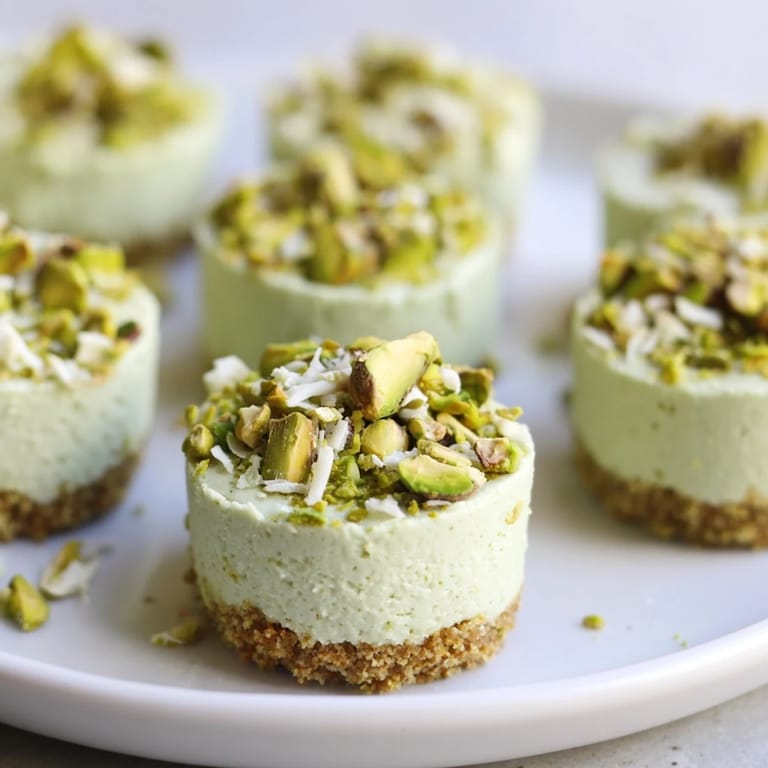
- Chopped pistachios (2 tbsp, for garnish): These add the visual pop and a tiny crunch at the very end that matters more than you'd think.
Tired of Takeout? 🥡
Get 10 meals you can make faster than delivery arrives. Seriously.
One email. No spam. Unsubscribe anytime.
Instructions
- Set up your stage:
- Line your mini muffin tin with paper liners or grab a silicone mold if you have one—the silicone makes removal so much easier that I've started buying them specifically for this. It takes two minutes and saves you from the panic of sticky liners.
- Build the crust:
- Pulse your pistachios in the food processor until they're finely ground but still a little textured, not a paste. Add the graham cracker crumbs, sugar, and salt, then pulse again until everything is combined and looks like wet sand. Drizzle in the melted butter and pulse one more time until the whole thing holds together when you squeeze it.
- Press and set:
- Divide the crust mixture evenly among your cups—I use a heaping tablespoon as my guide and press it down firmly with the bottom of a small glass. The crust should be compact and feel solid, not loose, or your whole bite falls apart.
- Cream the cheese:
- Beat the softened cream cheese until it's completely smooth and pale, then add the powdered sugar and pistachio paste. Beat until there are no streaks of white or green left, and the mixture looks light and creamy.
- Add the clouds:
- In a separate bowl, whip the heavy cream to soft peaks—it should look like fluffy clouds, not stiff, because you still need to fold it gently. Fold in the whipped cream and lemon zest (if using) with a spatula, moving slowly so you don't deflate all that air you just created.
- Fill with care:
- Spoon or pipe the filling into the crusts, smoothing the tops with the back of a spoon or an offset spatula. This is the step where they start looking like something you'd see at a bakery.
- The hardest part—waiting:
- Chill in the refrigerator for at least 3 hours until the filling is set and cold. I usually make these in the morning and chill them overnight, which gives me peace of mind and also makes them taste even better.
- Finish and serve:
- Carefully pop them out of the tin, sprinkle with chopped pistachios and whatever garnish you're feeling, and arrange them on a plate like you meant to do this the whole time.
 Pin it
 There's a moment when you pull these out of the fridge and the filling has set into something almost too beautiful to disturb that reminds me why I bake—it's not about feeding people, it's about creating tiny moments of joy that fit in the palm of your hand. The first time someone tells you these taste homemade in a way that store-bought never does, you'll understand exactly what I mean.
Make Them Shine
The garnish is your final word on these bites, so don't skimp or phone it in. White chocolate shavings add richness, dried rose petals bring an unexpected floral note that people will taste before they can identify it, or you can keep it simple with just the chopped pistachios if you want the pistachio flavor to be the only story being told. I've done all three versions for different occasions, and honestly, I can't decide which one I like best, so I rotate them based on my mood and what's in my pantry.
Storage and Timing
These live happily in the refrigerator for up to three days in an airtight container, and they're actually better on day two because the flavors have had time to meld and deepen. If you're making them for a party, prepare them the morning of or the night before, and you'll free up your actual event day for things like not stressing about dessert. I once tried to make these two hours before guests arrived, and the crust wasn't set, the filling wasn't cold, and I served them slightly melting and pretended that was intentional.
Variations and Upgrades
Once you understand the basic structure, you can play around with the filling—I've done pistachio with a hint of cardamom by adding 1/4 teaspoon of ground cardamom to the cream cheese, which tastes like a fancy Italian bakery if you squint. Matcha powder could work in place of some of the pistachio paste, and I'm convinced that a salted honey drizzle on top would be incredible even though I haven't tested it yet. The crust is flexible too; I've subbed in crushed pistachios for some of the graham crackers to make it extra nutty and press-worthy.
- For a gluten-free version, just use gluten-free graham crackers and the whole thing stays exactly as delicious.
- If pistachio paste is impossible to find where you live, you can make it by pulsing shelled pistachios in a food processor for about 5 minutes until the oils release and it becomes a paste.
- Make pistachio paste fresh, or buy the kind without added oils or sugar, because the cheaper varieties taste like they're pretending to be pistachio.
 Pin it
 These bites have become my answer to the question of what to bring when I want to impress without spending all day in the kitchen. They're proof that the smallest desserts can carry the biggest flavors and that no-bake is never a shortcut—it's just a smarter way.
Frequently Asked Questions
- → How do you make the pistachio crust?
Pulse shelled pistachios with graham cracker crumbs, sugar, and salt until sandy. Add melted butter and pulse again until combined. Press firmly into mini muffin cups.
- → Can I prepare these cheesecakes ahead of time?
Yes, they require chilling for at least 3 hours and can be stored refrigerated for up to 3 days in an airtight container.
- → What gives the filling its pistachio flavor?
The filling includes smooth pistachio paste or pistachio butter folded into cream cheese and whipped cream for a rich, nutty taste.
- → Are there any dietary variations suggested?
For gluten-free options, substitute regular graham cracker crumbs with gluten-free varieties. The bites are vegetarian-friendly.
- → What toppings can enhance these bites?
Chopped pistachios, white chocolate shavings, or dried rose petals add texture and elegance to the finished bites.